React 组件
可以通过在字段上设置 ui.component 属性来传递和渲染自定义组件。
这个组件完全覆盖了原始组件,提供给用户完全自定义字段的能力。
自定义组件中的环境变量
自定义字段组件在 Tina 管理界面中运行,该界面作为一个与您的网站分开的静态 SPA构建。环境变量在构建时嵌入到管理界面的 JavaScript 中——它们不会在运行时读取。这意味着要使变量可用,必须满足两个条件:
- 必须使用允许的前缀。 出于安全原因,仅包括以下变量:
TINA_PUBLIC_*NEXT_PUBLIC_*NODE_ENVHEAD
- 必须在运行
tinacms build(或tinacms dev)时设置。 如果变量在构建期间不在环境中,则无论其名称如何,它都不会存在于管理界面中。
任何其他环境变量(例如 process.env.MY_SECRET_KEY)在自定义组件中将是 undefined。
// 这是可行的——正确的前缀并在构建期间设置const apiKey = process.env.TINA_PUBLIC_MY_API_KEY// 这将是未定义的——没有允许的前缀const secret = process.env.MY_API_KEY
ui.component 属性
这应该设置为一个有效的 React 组件,该组件接受最多四个属性:
field: 当前字段的字段定义。input: 制作输入所需的数据和回调。meta: 表单中关于字段的元数据。(例如dirty、valid)。form: CMS 表单,用于检索和更新同一集合中的其他字段。
保留元数据
要在自定义组件上保留相同的标签、描述、验证和其他元设置,可以使用包装函数 wrapFieldsWithMeta。
表单管理
form 属性可用于控制其他字段中的表单值。
集合中的任何字段都可以使用 form.change 更新——form.change(name: string, value: any) => void,使用字段的 name 属性。
集合中的任何字段都可以使用 form.getFieldState(name: string)?.value 访问,使用字段的 name 属性。
可以从 react-final-form FormAPI 文档中推断出更多的使用模式。
隐藏字段
将 component.ui 设置为值 "hidden" 会将字段从编辑器中移除。
该字段仍然在后台存在,并且可以通过其他方式访问。
示例
滑块组件
这是一个可用于调整图像饱和度的自定义滑块组件。
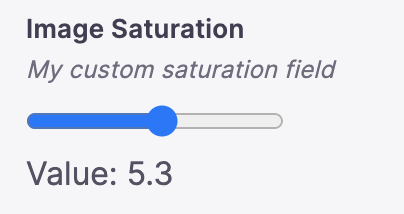
{label: "图像饱和度",name: "saturation",type: "number",description: "我的自定义饱和度字段",ui: {parse: (val) => Number(val),component: wrapFieldsWithMeta(({ field, input, meta }) => {return (<div><inputname="saturation"id="saturation"type="range"min="0"max="10"step=".1"// 传递 props.input.onChange{...input}/><br />值: {input.value}</div>)})}}
带有隐藏元字段的图像组件
NextJS 和其他框架能够在提前知道图像宽度和高度的情况下提高性能。
TinaCMS 可以用于在上传时确定并存储这些信息。
我们可以传递现有的 TinaCMS 图像组件,并使用 useEffect 拦截对其的更改,以更新我们的宽度和高度字段。
import { ImageField } from 'tinacms';const CustomImageField = (props) => {const loadImage = async (url) => {const img = new Image();img.src = url;await img.decode();return img;};const { form, input } = props;useEffect(() => {loadImage(input.value).then((img) => {form.change("imgWidth", img.naturalWidth);form.change("imgHeight", img.naturalHeight);});}, [form, input]);return ImageField(props);};
在内容模型中,我们还需要两个额外的字段用于高度和宽度,这些字段设置为 "hidden",因此它们不会出现在编辑器中。
{type: 'image',label: '主图像',name: 'imgSrc',ui: {component: CustomImageField,},},{type: "number",name: "imgWidth",ui: {component: "hidden",},},{type: "number",name: "imgHeight",ui: {component: "hidden",},}
这在编辑器中显示为一个单一的图像输入,但每次更新时将保存 3 个值(图像源、高度和宽度)。
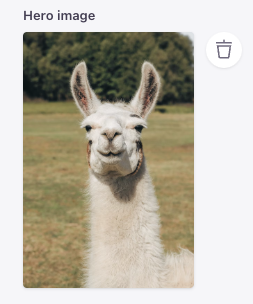
imgSrc: /uploads/llama - 2.avifimgWidth: 987imgHeight: 1480
条件组件
可以通过检查其他表单字段的值来创建条件字段。
使用这种方法,隐藏的条件字段将保留在隐藏之前保存的任何值。

{type: "boolean",name: "imageEnabled",label: "启用图像",},{type: 'image',label: '主图像',name: 'imgSrc',ui: {component: (props) => {const { form } = props;return form.getFieldState("imageEnabled")?.value ?ImageField(props) : null;},},},
图标选择器组件(视频)
下面的教程包括一个关于使用自定义字段组件创建自定义图标选择器的部分。
图像缩放滑块组件
通过一些额外的 CSS,您可以在 Tina 中创建可缩放的图像。这将节省您为博客裁剪图像的时间。
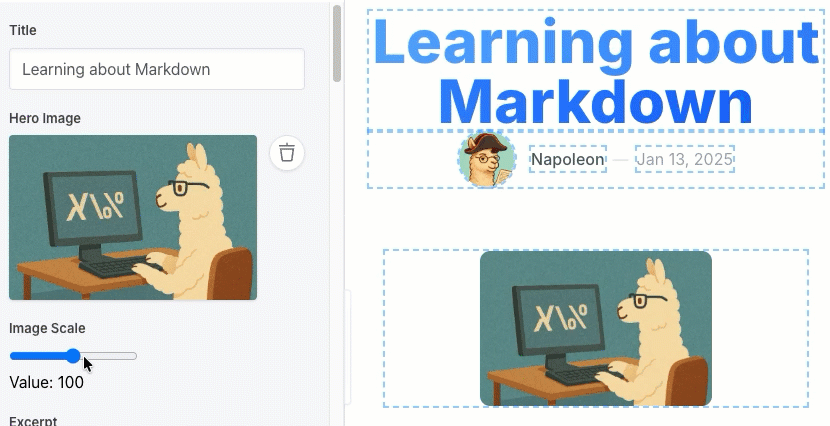
import { wrapFieldsWithMeta } from 'tinacms';// 在您的集合中{label: "图像缩放",name: "scale",type: "number",description: "我的自定义图像缩放器",ui: {parse: (val) => Number(val),component: wrapFieldsWithMeta(({ field, input, meta }) => {return (<div><inputtype="range"min="1"max="200"step="1"{...input}/><br />值: {input.value}</div>)})}}
import client from "@/tina/client";import { useTina } from "tinacms/dist/react";// 您的组件const Image = (props)=>{const response = useTina({query: props.query,variables: props.variables,data: props.data});return <div style={{width: '500px',height: '500px',position: 'relative',}}><imgsrc="/llama.png"style={{position: 'absolute',objectFit: 'contain',scale: response.data.scale / 100,}} /></div>}
使用 AI 构建自定义组件
在下面的视频中,探索了一种构建自定义组件的氛围编码方法。这展示了如何通过使用 AI 快速迭代复杂的 UI 逻辑和样式,以创建个性化的字段体验。
视频:Vibe Coding TinaCMS 自定义组件(7 分钟)