Creating and deleting content — two fundamental sides of the CMS coin. This article will cover how to set up this functionality with TinaCMS on a Gatsby site. But first, some overview.

Tina Overview — sidebar, forms, plugins
When you install Tina, you immediately get access to a sidebar. This sidebar is the main interface for editing and managing content with Tina
To make content editable on your site, you need to register a form to Tina. Forms appear in the sidebar, displaying fields where you can edit content on the page.
Plugins extend the functionality of the core CMS. Behind the scenes, plugins do some big work with Tina. They register forms, create new screen views, and allow us to add new content. If you're interested to learn more, read this post on Tina's dynamic plugin system.
Creating New Files
The Steps 🚶♀️
These steps will be our journey-map for setting up content-creation functionality in a Gatsby website.
Where to add the plugin
Before we get into the steps, we need to zoom out to consider the editing process in our site. As a developer, you get to decide when editors can create new content.
To be more specific, you can register the content-creator plugin on any component in the site. When that component renders, editors will be able to create new content.
You may want create a new blog only when you're on the blog list page. To do this, you'll register the plugin on the list component.
If you always want to be able to create new blogs, you'll register the plugin on a component that is always rendered. Examples of this could be the Layout or Root component.
Consider the experience before you dig into code. One of the incredible things about Tina is that you have this finite control, so use it.
Step 1: Set-up a content-creator plugin
Okay, let’s get into it. In this step we are going to create a content-creator plugin 👩🎨.
There are different plugins for creating new markdown or JSON files. In this tutorial, we'll use RemarkCreatorPlugin for markdown files. Feel free to read about the JsonCreatorPlugin in the documentation.
Head to the component file where you want to add this plugin. This example will use the Layout component. This way, the ability to create new posts is always available to the editor.
The example below shows how to create an instance of a RemarkCreatorPlugin. The basic information the plugin needs is a label, filename, and fields array.
/*** Layout.js*//*** 1. import RemarkCreatorPlugin to** construct a `content-creator` plugin.*/import { RemarkCreatorPlugin } from 'gatsby-tinacms-remark';/*** 2. instantiate RemarkCreatorPlugin with** label, filename, and fields.*/const CreatePostPlugin = new RemarkCreatorPlugin({/*** LABEL: A simple action label displayed when editors** interact with the + button in the sidebar.*/label: 'New Blog Post',/*** FILENAME: A function whose return value** should be the path to the new file.*/filename: (form) => {return form.filename;},/*** FIELDS: An array of field objects defining the shape** of the form to fill out when creating a new file.*/fields: [{name: 'filename',component: 'text',label: 'Filename',placeholder: 'content/blog/hello-world/index.md',description:'The full path to the new markdown file, relative to the repository root.',},],});
Formatting the path to the new file
There are many ways you could set up the return value for the filename. A helpful pattern to use could be to hard-code the directory path, and then 'slugify' the title. You can do this manually with Regex or use a handy package aptly called slugify.
const CreatePostPlugin = new RemarkCreatorPlugin({//...filename: (form) => {// 'form' holds the data inputted by the 'create-form'const slug = form.title.replace(/\s+/, '-').toLowerCase();return `content/blog/${slug}.md`;},});
Notice how data submitted by the create-form is being used. When a new file is created, you can have the editor enter a title, and then all the create-form data is passed to the filename function.
You can use the data from create-form to creatively generate new file paths or populate default data (more on that later). Overall, formatting the filename depends on the structure of your project. Pick a simple solution that makes sense to you or checkout more examples here.
2. Register the plugin with the sidebar
In the previous step, we created the plugin, now we actually need to add it to the sidebar (and cms).
If you haven't already, install the tinacms package.
$ yarn add tinacms || npm install tinacms
Then import withPlugin from tinacms. withPlugin is a higher-order component used for adding plugins to the CMS.
Export the component and plugin using withPlugin and you should now be able to add new posts from the Tina sidebar. The location of the new files will be based on the return value from the filename function.
// 1. Import withPluginimport { withPlugin } from 'tinacms'import { RemarkCreatorPlugin } from 'gatsby-tinacms-remark'function Layout(props) {return (/*** Nothing gets changed in the actual component** to register the `content-creator` plugin*/)}// 2. Create instance of `RemarkCreatorPlugin`const CreateBlogPlugin = new RemarkCreatorPlugin( {label: 'Add New Blog',filename: form => {const slug = form.title.replace(/\s+/g, '-').toLowerCase()return `content/posts/${slug}.md`},fields: [{label: 'Title',name: 'title',component: 'text',required: true},],})// 3. Export the component & `content-creator` pluginexport default withPlugin(Layout, CreateBlogPlugin)
Start up your development server (gatsby develop) and you should see a blue plus (+) icon in the top menu of the sidebar. Click it and you’ll see the label you set in your plugin configuration. Try to create a new file! See what happens.
Troubleshooting Tip: If you don't see the icon, check if the component where you added the plugin is actively rendered.
3. Customize The Create Form
In our initial example, the create-form only captured a title. We can add more fields to capture data that will populate the new file, such as the date and author.
const CreatePostPlugin = new RemarkCreatorPlugin({label: 'Create Post',fields: [{name: 'title',component: 'text',label: 'Title',description: 'The title of your new post',required: true},{name: 'date',component: 'date',label: 'Date',description: 'The default will be today'},{name: 'author',component: 'text'label: 'Author',description: 'Who wrote this?',}],filename: form => {const slug = form.title.replace(/\s+/, '-').toLowerCase()return `content/blog/${slug}.md`},})
Notice the use of a required property on the title field. Use this to ensure you get all the required data necessary for creating the new file.
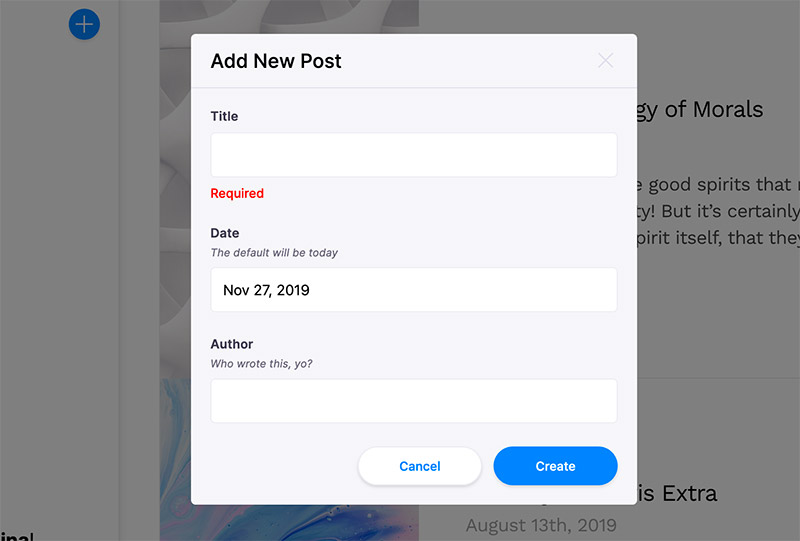
4. Configure Defaults
RemarkCreatorPlugin can take additional information to populate default data into newly created files. For markdown, we can add default frontmatter values and a markdown body — see the example below.
const CreateBlogButton = new RemarkCreatorPlugin( {label: 'Add New Post',filename: form => {const slug = form.title.replace(/\s+/g, '-').toLowerCase()return `content/posts/${slug}.md`},fields: [{label: 'Title',name: 'title',component: 'text',required: true},{label: 'Date',name: 'date',component: 'date',description: 'The default will be today'},{label: 'Author',description: 'Who wrote this, yo?',name: 'author',component: 'text'}],/*** 1. Add default frontmatter with data inputted** through fields in the `create-form`*/frontmatter: postInfo => ({title: postInfo.title,date: postInfo.date ? postInfo.date : new Date(),author: postInfo.author ? postInfo.author: ‘Kurt Vonnegut’}),// 2. Add a default markdown bodybody: postInfo => `New post, who dis?`})
Both the frontmatter and body functions receive the data captured by fields in the create-form. Use the inputted values to populate the new file, or setup defaults if nothing was entered.
Deleting Files
With the power to create, comes the power to delete 🧙♀️. I promise you this step is much simpler.
Instead of adding a ‘delete’ plugin, we simply need to pass a delete-action to the main form options.
Head to a file where you have a Tina form configured in your project. This will typically be a template file that generates multiple posts, case studies, etc. If you don’t have a Tina form configured in your project, learn more about creating forms with Gatsby+Tina here.
You don't want to give the editors the power to delete files that they shouldn't. So think about where you want this action to be available. For something like a blog, it makes sense to add the delete-action to a blog template form. But it might not make sense to add the delete-action to a form that edits global site configuration, for example.
Below is an example blog template with the delete-action added:
// 1. Import `DeleteAction`import { remarkForm, DeleteAction } from 'gatsby-tinacms-remark';function BlogTemplate(props) {return (<><h1>{props.markdownRemark.frontmatter.title}</h1><p>{props.markdownRemark.frontmatter.description}</p></>);}// 2. Add the `DeleteAction` to the formlet BlogFormOptions = {actions: [DeleteAction],fields: [{label: 'Title',name: 'frontmatter.title',description: 'Enter the title of the post here',component: 'text',},{label: 'Description',name: 'frontmatter.description',description: 'Enter the post description',component: 'textarea',},],};export default remarkForm(BlogTemplate, BlogForm);
You can import the DeleteAction from gatsby-tinacms-remark or gatsby-tinacms-json, depending on your filetype. Then on your form options definition, add the action and that’s it!
You can now access this delete-action via the three-dot icon near the save button. Test it out! But make sure you don't delete a file that you need or can easily restore it if you do 🧞♂️.
Happy Creating (and Deleting)! 👩🎤
Hopefully this tutorial gave you some insight into setting up two core bits of CMS functionality with Tina + Gatsby.
Stoked on TinaCMS? Please ⭐️ us on GitHub or Tweet us 🐦 to show-off your Tina projects.